Using an Image as Background
You have already learned how to create a background for a page using a single color. Guess what? You can also use an image as the background for a page. Instead of using BGCOLOR, you would use the BACKGROUND attribute within the BODY tag. For example, if I had an image called image.gif that I wanted to use as the background for a page, I could use this code:
<BODY BACKGROUND="image.gif">
Pretty neat, huh? One thing to keep in mind is that if you use an image as background, be sure to pick an image that is fairly subtle. A background image that is too bright or colorful can ruin a Web page. One of my favorite sites to choose a background image is www.grsites.com. Be sure to check it out.
Here's another neat trick. By using this code:
<BODY BACKGROUND="image.gif" BGPROPERTIES="fixed">
you can create a fixed background image, which means that when you scroll up and down the page, the background image will not move. It's a neat effect. Try it out sometime.
Using an Image as a Link
Guess what? You can make an image a link to another page. It’s a neat effect, and it isn’t that hard to do. Here's the format:
<A HREF=http://google.com"><IMG SRC="images/computer.gif"></A>
Look at at the code. Can you figure out what I did? I placed an image tag where I would normally have placed words. In this example, I created a link to the Web Design home page. Here's what you get with that format.

Click on the image if you'd like to test the link. Neat, huh? But do you notice that new border around the image? That's what happens when you use an image as a link. It attempts to turn blue, purple, or whatever color the text for your links is set to, so it places what's known as a "border" around the image. Some people like it. I don't, and I know how to get rid of it.
To make the border disappear, you add a simple attribute to the code above. Here's the format:
<A HREF="index.html"><IMG SRC="images/computer.gif" BORDER="0"></A>
See what I did? I added an attribute that denoted that the border should be 0. Here's what you get using BORDER="0":

It's a link, really! If you don't believe me, click the image and see what happens.
A Sample Web Page
This will be your first assignment this week. First, I want you to save all three of these images into your images folder. If you forgot how to do this, read the section above called Storing an Image.
 |
 |
 |
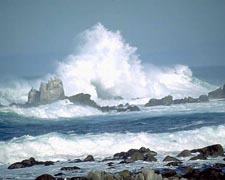
Naming these files is very important. Name the picture of the ocean "ocean.jpg" (notice that this is a JPG file, since it is a photo). Name the picture of the earth "earth.gif" and the picture of the fire "fire.gif".
After you are done with that, open up Wordpad or Notepad and type this code:
<HTML>
<HEAD>
<TITLE>Placing Images on Web Pages</TITLE>
</HEAD>
<BODY>
<CENTER><FONT COLOR= "#990000"><H2>Placing Images on Web Pages</H2></FONT></CENTER>
<P>This week, I learned how to do a few things with images. First, I learned how to place an image on a page and align it to the right, center, or left. Here is an example: <P><IMG SRC="images/ocean.jpg" ALIGN="right">
<P>
<P>
<P>
<P>
<P>
<P><CENTER><IMG SRC="images/ocean.jpg"></CENTER>
<P>
<P><IMG SRC="images/ocean.jpg">
<P>
<P><IMG SRC="images/earth.gif"ALIGN="left" ALT="The Earth">Another neat thing I can do with images is wrap text around them. For example, this is a picture of the earth, and as you can see, the text wraps right around it.
<P>
<P><IMG SRC="images/earth.gif"ALIGN="right" ALT="The Earth">Here is the same image, but this time it is aligned to the right. Another neat thing about this image is that if you are using Internet Explorer and you move your mouse over the image, you will see some text pop up in a small box.
<P>
<P>Another thing I know how to do is change the size of an image. Here is the original image:
<P><IMG SRC="images/fire.gif">
<P>Here is a larger version of the same image:
<P><IMG SRC="images/fire.gif" HEIGHT="200" WIDTH="200">
<P>And here is a smaller version of the same image:
<P><IMG SRC="images/fire.gif" HEIGHT="50" WIDTH="50">
</BODY>
</HTML>
You'll notice one little trick that I added to this page. Notice the lines of code that say:
<P>
If you remember your HTML tags, you'll know that this is a paragraph tag followed by a space. This is a simple way to create a little extra space on your Web pages.
You have now completed the Week 9 Lesson. Please re-read this information until you feel that you really understand it. If you feel like you already understand the information on this page, you are ready to complete your Week 7 Assignments.